My Fearless Kitchen

Quick tips and easy recipes to chase the fear out of your kitchen.

  • Email
  • Facebook
  • Instagram
  • Pinterest
  • Twitter

  • mfk_utensils
  • Recipes
      • Quick and Easy
      • Slow Cooker
      • Grill
      • Freezer Friendly
      • Dips & Snacks
      • Breakfast & Breads
      • Dessert Recipes
      • Main Dish Recipes
      • Side Dish Recipes
      • Soups & Salads
  • Kitchen Tips, Tricks, & More
  • About Farming & Food
    • About GMOs
    • Antibiotics
    • Meat
    • Pigs
    • Eggs
    • Poultry
  • Disclosure, Disclaimers, & Privacy Policy
Home » Garlic Bubble Bread, recipe #3

Garlic Bubble Bread, recipe #3

By Marybeth Feutz 4 Comments

From the farm to the kitchen…

Can I just say, I am loving this cookbook!autumnfamilyfriends I made Garlic Bubble Bread to go along with girl’s night Perfect Cheesy Pasta Bake. The bread was the hit of the party. (What can I say, we love butter and carbs!)

As always, gather your ingredients…ingredientsThis recipe calls for one pound of frozen bread dough. My grocery store didn’t have exactly that, but it did have frozen dinner roll dough. Worked great!!
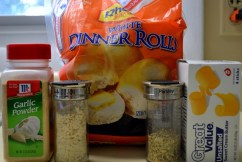
This recipe also calls for both garlic powder, and garlic salt. Use them. Love them. Yum.

It does take a little bit of time, though, so plan ahead!

First, thaw the bread (roll) dough according to package directions. dough ballsThen cut it up into bite-sized pieces. I cut each roll into 4-5 pieces. (This ends up being a super-savory version of the sticky-sweet pull-apart Monkey Bread. A fantastic variation on a theme!)bite-size piecesWhen your thawed bread dough is ready to go, melt 1/4 cup of butter (1/2 stick).butterAdd 1 tablespoon dried parsley, 1 teaspoon of garlic powder, and 1/2 teaspoon of garlic salt to the melted butter.spicesDunk the pieces of bread dough in, and let them get a good coating.buttery goodnessLayer the buttery, garlicky hunks of bread dough in a buttered loaf pan.   in a breadpanI started to run low on my melted butter mixture when I was about half-way through the dough-dunking. I melted another 1/4 cup (1/2 stick) and added it to the mix. This was a little too much, and I had extra left over. So I poured it over the top of the loaf pan. (We also love our butter!)ready for rising Let the dough rise for about an hour, until doubled in size. Mine didn’t rise very well – I had the air conditioning cranked in my house, and it was on the chilly side. I moved the pan closer to the pre-heating oven for the last 15 minutes, and the rising went much better then.

Bake this yummy concoction at 350 degrees for about 30 minutes. I left this in the oven in my stoneware for 35 minutes to get this perfect color.garlic heavenThe extra butter bubbled up over the sides of the bread in the corners of the pan, and the pieces on the bottom were so buttery delicious!

We all loved this bread, and I have already had requests for the recipe, and to make it again! I will definitely make this again!

Special thanks to Gooseberry Patch for providing me with this great cookbook to try and to share with you. If you would like to see other great recipes, check out www.realfarmwivesofamerica.com.

Printable recipe card:garlic bubble bread card

{Affiliate links were used in this post.}

Share this:

  • Click to share on Twitter (Opens in new window)
  • Click to share on Facebook (Opens in new window)

Related

Filed Under: Breakfast & Bread Recipes, Recipes Tagged With: Autumn With Family & Friends, baking, bread, Gooseberry Patch, In the Kitchen, Real Farmwives, recipe

« Buckets of fun on the farm
Grill it up! »

Comments

  1. Lana says

    07/04/2011 at 12:05 am

    Each ingredient is gold here too! Sounds delish!

  2. apple blossom says

    07/04/2011 at 1:10 pm

    we love garlic bread. sounds yummy and pretty easy

  3. Dani says

    07/05/2011 at 12:41 pm

    looks yummy and easy!

  4. WhoMe? says

    07/08/2011 at 6:50 pm

    This bread was so good I’m STILL thinking about it!

Comment Policy

I welcome comments and conversation. All comments are moderated, and may not appear immediately. As long as you are respectful and courteous, your comment will be approved.
(Read my comment policy for more details.)

Leave a Reply

You must be logged in to post a comment.

This site uses Akismet to reduce spam. Learn how your comment data is processed.

Hi! I'm Marybeth, the blogger behind My Fearless Kitchen! Jump in, and let me share what I'm learning about food, farming, quick kitchen tips, and easy recipes to chase the fear out of YOUR kitchen! Read more.
Follow Us On Pinterest

Popular Posts

Half-Sour Refrigerator Pickles

Honey-BBQ Oven-Baked Ribs

  • Email
  • Facebook
  • Instagram
  • Pinterest
  • Twitter
Comment Policy — Disclosures, Disclaimers, & Privacy Policy

Copyright © 2025 · My Fearless Kitchen